Building a Connector
To get started with a new data source in the Tuva Project, for which there is no pre-built connector, you must build a custom connector. In the context of The Tuva Project, a connector is a dbt project containing SQL models that standardize and transform raw data so it meets the expectations of the Tuva Input Layer. For example, this can include renaming columns to match Tuva column names, adjusting formats of the columns so that the values match the Input Layer and transforming the data when the expected values in input layer rows have a different grain (level of detail or uniqueness of each row of a table, or what each row represents) than the source data.
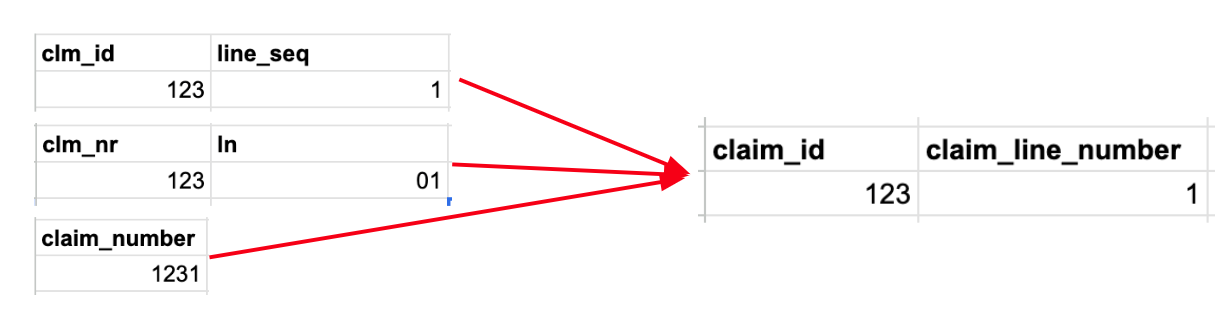
The image above shows an example of the following transformation steps that would all be performed within a connector:
- Column Names: Source column names (like clm_id or clm_nr) must be renamed to align with the Tuva column names in the Input Layer (claim_id).
- Data Types: Additionally, in the second source example, claim_line_number is stored as a string with a leading zero in the first position, but the Tuva Input Layer requires that it be stored as an integer, so the data type must be adjusted.
- Logical Transformations: Occasionally information in the source may be contained within fewer (or more) columns (or rows) than specified in the Input Layer. In this example, claim_number in the source data is a concatenation of the value of claim_number and the claim_line_number. The Tuva Input Layer requires claim_number to be named claim_id and to contain only the claim header ID. The claim_line_number must be extracted in the third data source and placed in the claim_line_number column.
This guide describes how to build a connector using our Connector Template. The video below summarizes this.
Prerequisite: Source Data Is Already Loaded
Before you create a connector, your claims data, clinical data, or both should already be loaded into your cloud data warehouse. We typically load source data into a raw schema named raw_<data_source>.
Your connector will read from those raw source tables and transform them into the Tuva Input Layer.
Step 1: Create a New Repo from the Connector Template
First, get the connector template onto your local machine.
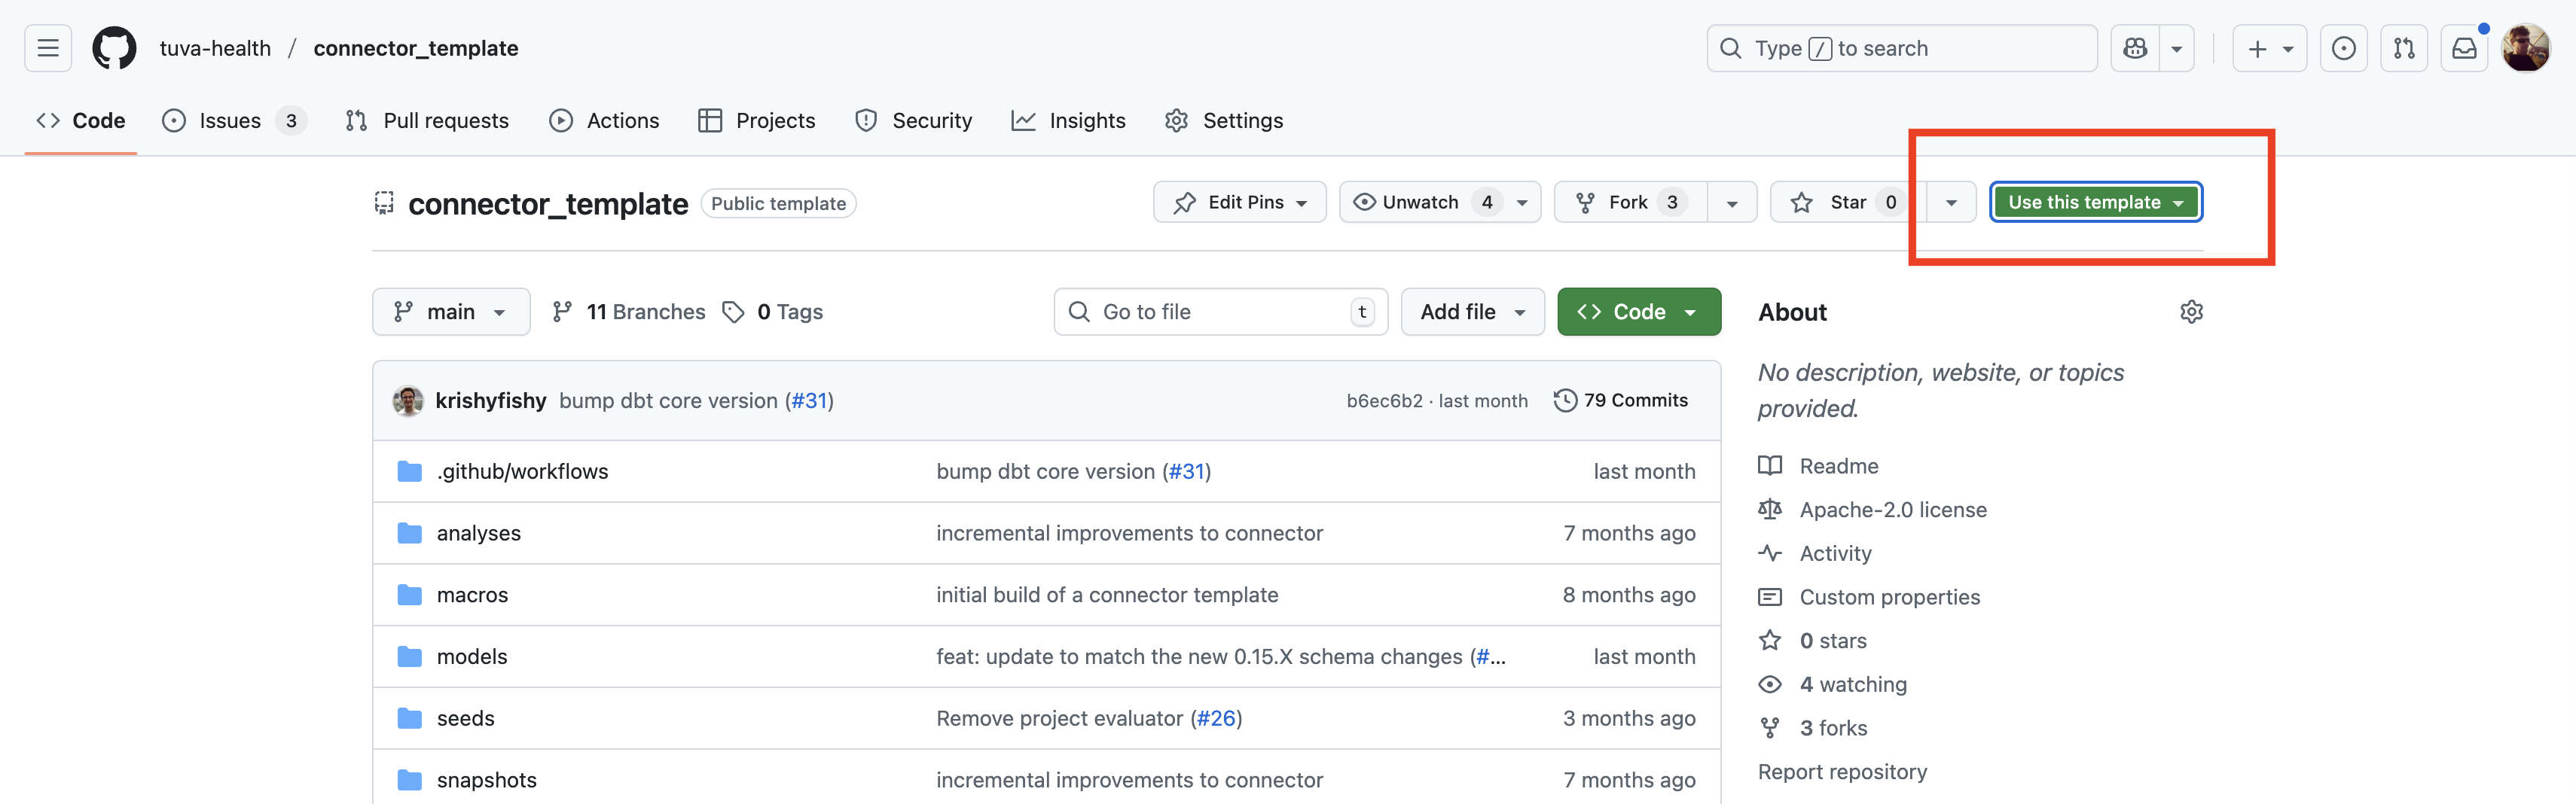
- Visit the Connector Template repository on GitHub.
- Click Use this template.
- Name your new repository. We recommend choosing a name that aligns with your data source, for example
uhc_claims. - Click Create repository.
- Clone the new repository and open it in your editor.
git clone https://github.com/your-username/my-connector.git
cd my-connector
Step 2: Update dbt_project.yml
The dbt_project.yml controls the core behavior of the connector, including the project name and which parts of Tuva should run.
- Rename the project:
name: my_connector
- Rename the top-level key under
models:so it matches your new project name:
models:
  my_connector:
    +schema: input_layer
- Keep the dbt ref behavior flag enabled. The current connector template already includes this flag.
flags:
  require_ref_searches_node_package_before_root: true
This prevents dbt 1.11 ref warnings when Tuva refs the connector's root-project Input Layer models.
- Set the minimal connector variables based on the type of source you are mapping.
For a claims connector:
vars:
  claims_enabled: true
  clinical_enabled: false
  provider_attribution_enabled: false
  semantic_layer_enabled: false
For a clinical connector:
vars:
  claims_enabled: false
  clinical_enabled: true
  provider_attribution_enabled: false
  semantic_layer_enabled: false
If your source includes provider attribution data, set provider_attribution_enabled: true. If you need the semantic layer outputs, set semantic_layer_enabled: true.
Step 3: Configure and Test Your dbt Profile
Make sure your profiles.yml in ~/.dbt/ is configured so dbt can connect to your warehouse.
Validate the connection with:
dbt debug
Do not move forward until dbt debug succeeds.
Step 4: Install dbt Dependencies
Install the packages defined in packages.yml:
dbt deps
This pulls in Tuva and any other dbt packages required by the connector.
Step 5: Begin Building Your Models
The connector template is designed around two model layers:
models/staging/models/final/
Use models/_sources.yml to define the raw source tables your connector reads from. Update the schema and table names there so they match the tables that already exist in your warehouse.
The template defaults to source names that already look like Tuva input-layer tables. In practice, most users will need to update both models/_sources.yml and the staging models so they point to the actual raw claims or clinical tables in the warehouse.
The intended pattern is:
staging/is where casting and light source alignment happenfinal/exposes the Tuva Input Layer tables
Keep the input_layer tag on your connector models, or add it if you create new models. This makes it easy to build only the connector output before running the rest of Tuva.
Step 6: Build and Validate Only the Input Layer
Once you have a first pass of your staging and final models, build only the input layer:
dbt build --select tag:input_layer
Then run structural data quality:
dbt build --select tag:dq_structural
dq_structural checks whether:
- the expected input-layer tables exist
- the expected columns are present
- the data types match the Input Layer contract
- the documented primary keys are valid
You should not move on until structural data quality is passing.
Next, run logical data quality:
dbt build --select tag:dq_logical
dq_logical checks things that should generally be true about claims and clinical data. These results do not all need to be zero in order to continue, but nonzero results often indicate issues that will cause downstream problems.
The recommended workflow is iterative:
- Build the input layer.
- Run structural data quality.
- Run logical data quality.
- Review the results.
- Update your staging and final models.
- Rerun until structural is clean and logical is as good as it can reasonably be.
Step 7: Build the Full Project and Review Analytical Data Quality
Once your connector and input layer look sound, build the rest of Tuva:
dbt build
Then run analytical data quality:
dbt build --select tag:dq_analytical
This is the point where you validate the full project, not before structural and logical review.
The main analytical data quality outputs are:
analytical_key_metrics, which provides a sanity check against commonly used metricsanalytical_data_marts, which helps confirm that the major marts built successfully
Review those outputs and confirm the results make sense for your source data. If they do not, go back to your connector models, correct the mapping, and rerun the validation workflow.