Pre-built Connectors
| Data Source | Type | Format | GitHub |
|---|---|---|---|
| Aetna | Claims | Flat File | Link |
| Athenahealth | EHR | Database | Link |
| Bamboo | ADT | Flat File | Link |
| Canvas | EHR | Database | Link |
| Cerner | EHR | Database | Link |
| CMS BCDA | Claims | FHIR | Link |
| CMS CCLF | Claims | Flat File | Link |
| CMS LDS | Claims | Flat File | Link |
| eClinicalWorks | EHR | Database | Link |
| Elation | EHR | Database | Link |
| Epic (Clarity) | EHR | Database | Link |
| Health Gorilla | Clinical | FHIR | Link |
| Healthie | EHR | Database | Link |
| Metriport | Clinical | FHIR | Link |
| Zus | Clinical | FHIR | Link |
General Instructions
All connectors are dbt projects, not dbt packages. To use a connector, clone the entire repository to your local machine and use it as a dbt project (see Getting Started for basic instructions).
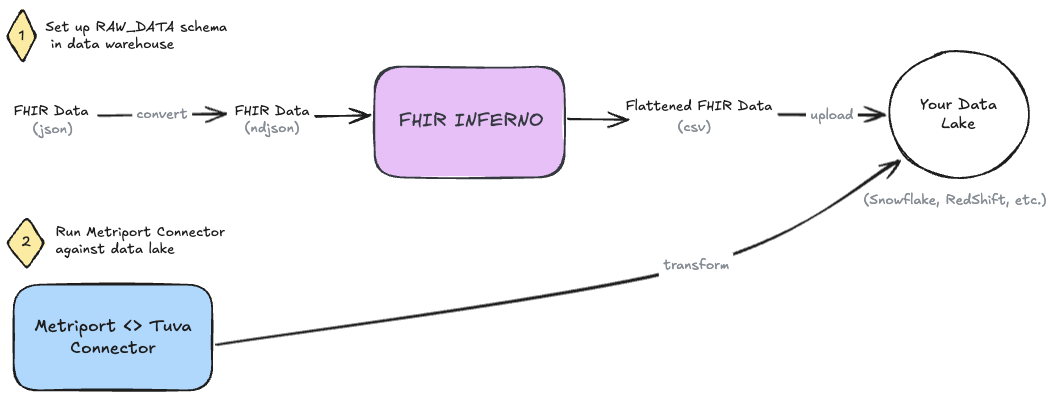
For FHIR data sources, you will first need to run FHIR Inferno to flatten the JSON into CSVs. Once that's complete you can load the CSVs into your data warehouse and use the connector.
Below we describe each connect / data source in more detail.
Aetna
Aetna most commonly shares claims data with partners in this format. The data dictionaries used in building this connector can be found here. This format follows the Universal Medical Eligibility 1000 File Record Layout for eligibility and the Universal Medical/Dental 1480 File Record Layout for medical_claim.
Headers: Typically, Aetna claims and eligibility files do not contain headers (i.e. column names at the top of the file). In the staging layer, we've named the columns in close alignment to the specifications of these files. There are some situations where naming columns exactly as they show up in the spec would cause collisions (e.g. last_name corresponding to both member_last_name and subscriber_last_name). In cases like these, we've altered the names to disambiguate between source columns and prevent these collisions.
Handling multiple files: This connector does not do any deduplication based on file_date or other file ingestion-specific data fields. It's possible that changing deduplication logic to key off of this information could be helpful in deduplication depending on your use case / volume of data.
Fixed-width files: These files are fixed-width. In some cases where trimming whitespace during file ingestion is not handled, adding trim() calls in staging may assist in removing whitespaces where needed.
Financials reported in cents: In most data files we've seen, financial information has been reported in cents rather than in dollar amounts. To handle this case, we divide fianncial columns by 100 in staging.
Athenahealth
Athenahealth is a widely used EHR in ambulatory and to lesser extent acute care settings. The great thing about Athenahealth is that they make the backend database available via Snowflake data share, similar to Elation. This connector maps that Snowflake data share to the Tuva Input Layer.
You can find Athenahealth's documentation of the database (called AthenaOne) here.
Bamboo
Bamboo, via their acquisition of Patient Ping, is one of the most common sources of ADT (admit, discharge, and transfer) data in the United States. This data is commonly transacted as HL7v2 messages. However, Bamboo flattens this data and makes it available to customers as CSVs. This connector maps that flattened format to the Tuva Input Layer.
Canvas
Cerner
The Cerner Connector is a dbt project that maps Cerner's Millennium Data Model to the Tuva Input Layer.
CMS BCDA
CMS provides access to claims data via a FHIR endpoint called the CMS Beneficiary Claims Data API (BCDA). You can read about it here.
To run this data through Tuva, you need to first flatten it with FHIR Inferno, and then run the CMS BCDA connector dbt project.
We also created a demo project that leverages the sample CMS BCDA data BCDA demo project.
Step 1: Flatten FHIR to CSVs
Create configs for BCDA JSON files
This step is only required if your BCDA files differ in format from the sample BCDA data. Unfortunately there isn't a good way to tell if your data is structured differently until you attempt to run the connector.
- Clone the FHIR_inferno repository
- Delete the config files in
fhir_inferno\configurations\configuration_bcda\config - Copy your JSON into the
fhir_inferno\configurations\configuration_bcda\input_fhirfolder - Open the script
analyzeJson_new.pyinfhir_inferno\helper_scripts - In
analyzeJson_new.py, update the configurations:folder_path- path to your BCDA files (e.g...\configurations\configuration_bcda\input_fhir)keyword- the filename or JSON resource type (e.g.coverage)anchor_path- root path of the JSON (leave blank when executing the script for the first time)ignore_list- paths in JSON to ignore (leave blank when executing the script for the first time)inputFormat- default to ndJSON; no need to update
- Execute the script
py analyzeJson_new.py
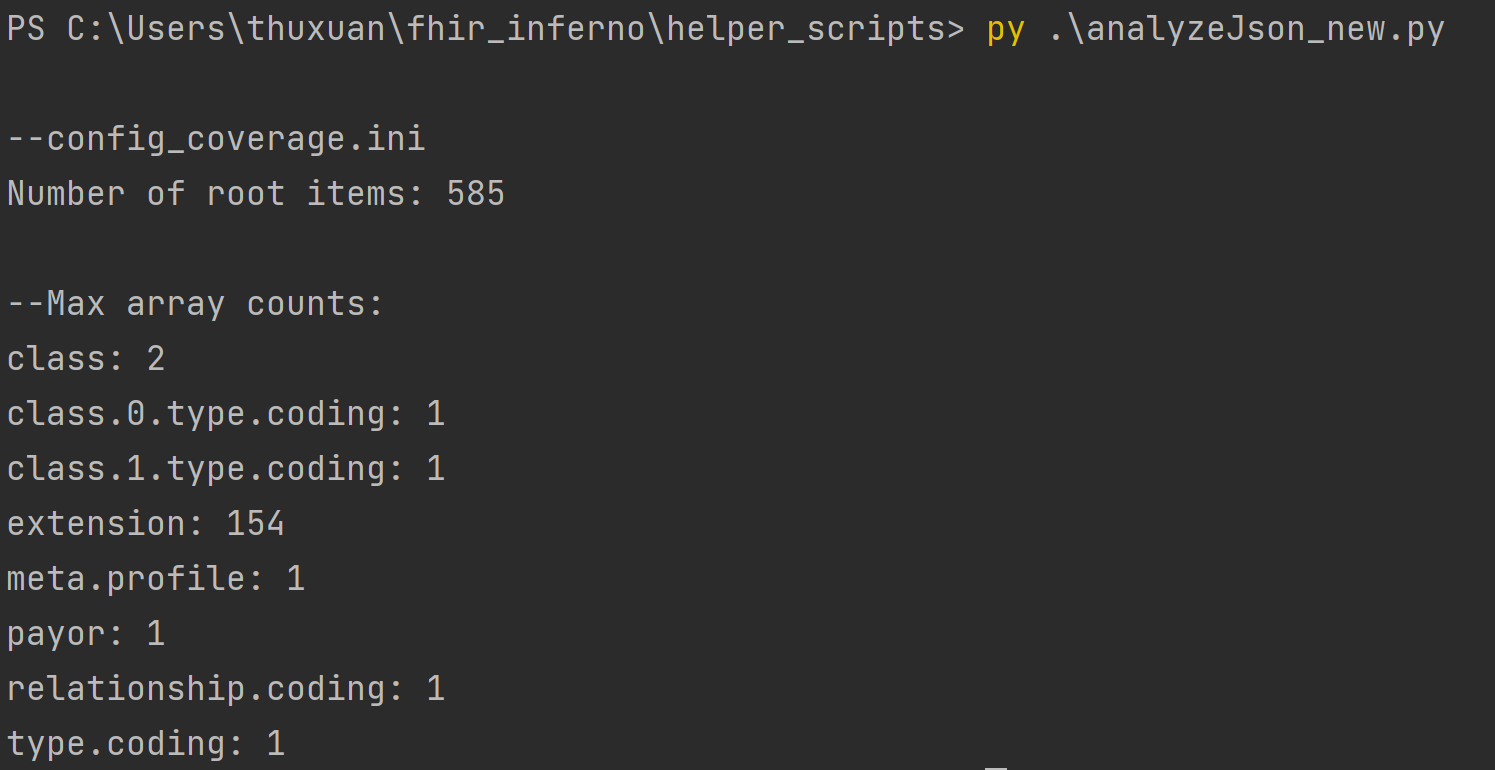
In the terminal, analyzeJson_new.py will output the different keys in the JSON file. The number following the key is
how many arrays are in each key. Since we are flattening the FHIR object, think of the keys as tables and the arrays
as columns. Decide which keys should be broken out into its own table to cut down on the number of columns. The screenshot below depicts the output of the coverage resource. The key extension will be split into its own table with 154 columns.
-
Once you’ve decided which keys you want to split out, update the configuration in
analyzeJson_new.pyand rerun the script for each key.- Update
ignore_pathwith all keys you want as a separate file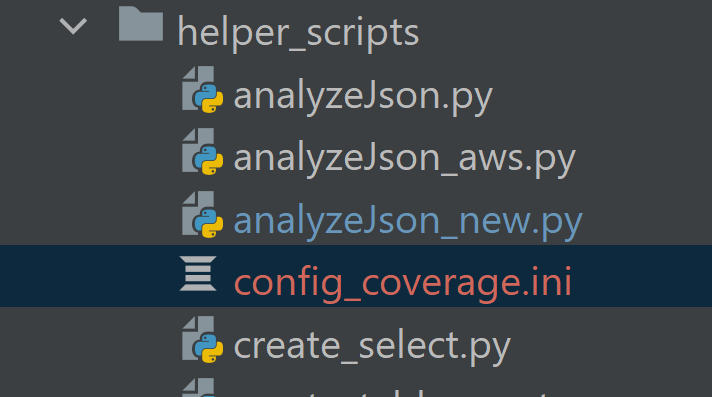
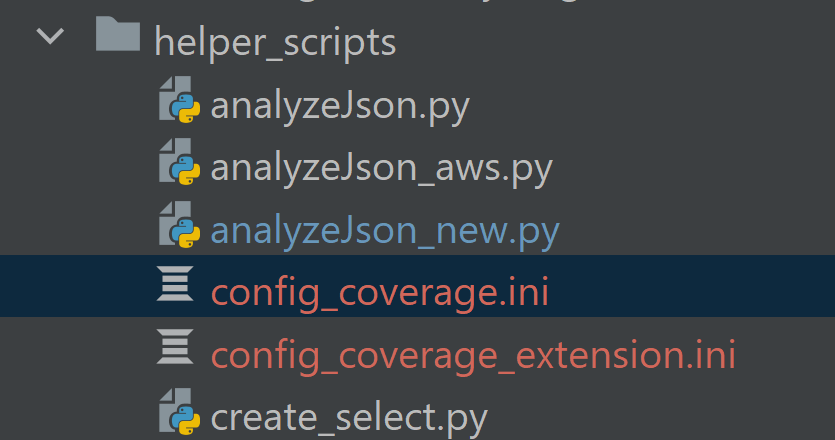
- Rerun anaylzeJson_new.py. A file called config_coverage.ini will be generated in the same directory as
anaylzeJson_new.py. This config file contains the information to parse the coverage resource without the extension key.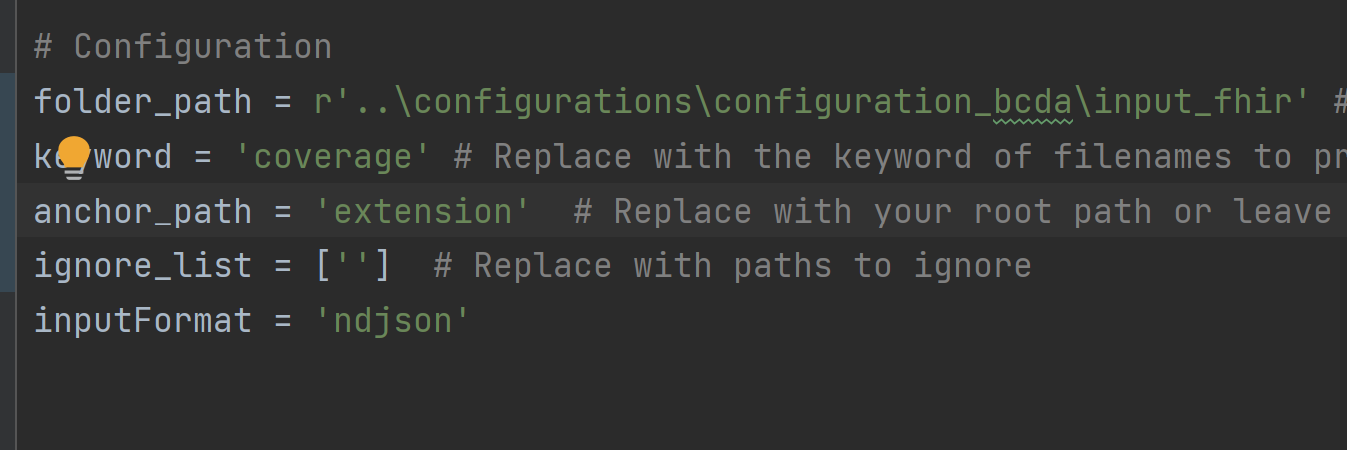
- Move extension from ignore_path to anchor_path. Rerun anaylzeJson_new. Another file called config_coverage_extension.ini
will be generated in the same directory as anaylzeJson_new. This config file contains the information to parse the
coverage resource without the extension key.
- Update
-
Repeat steps 5-7 for each resource in the BCDA data (i.e. patient and explanationofbenefit)
-
Update each config file with a primary key to facilitate JOINs between tables
- In the BCDA data,
idis the unique identifier for each line. In the main resource, e.g.coverage, moveidto the top of the list of arrays under[Struct].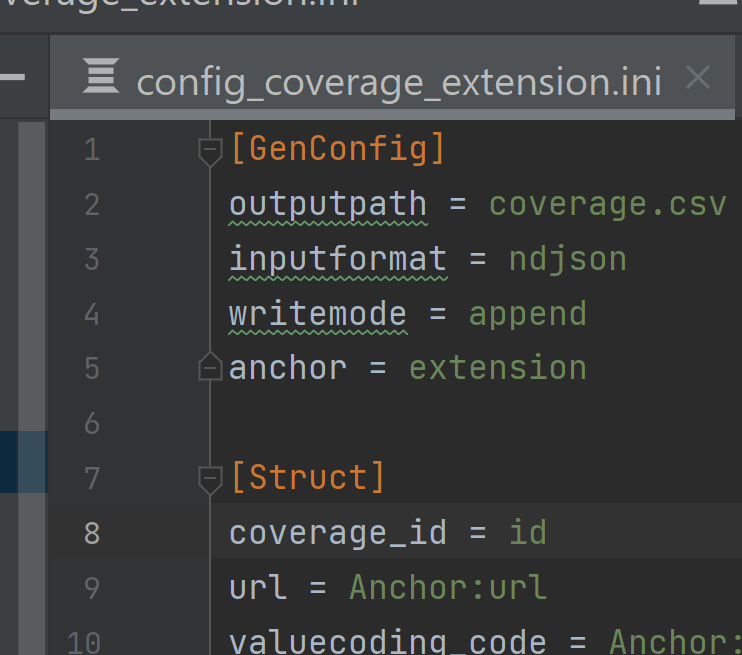
- In the sub resource, e.g.
coverage_extension, add coverage_id = id to [Struct]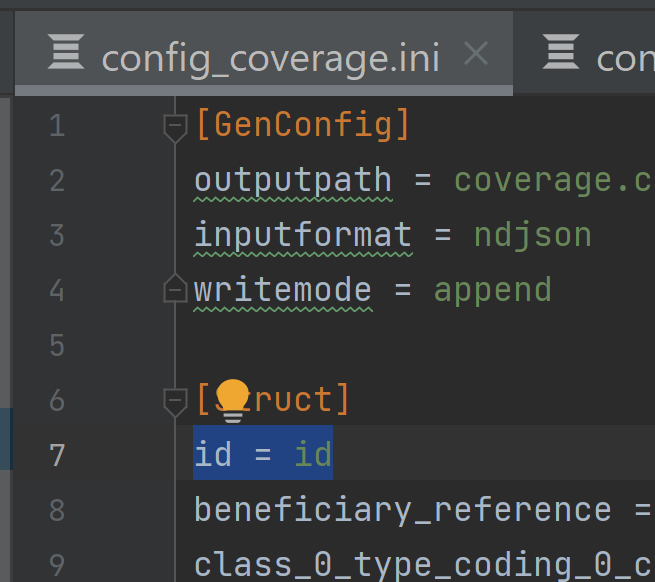
- Repeat step 9 for each resource
- In the BCDA data,
-
Copy all config files to
fhir_inferno\configurations\configuration_bcda\config
Parse JSON files to create CSVs
Now that you've generated the configs, which are the instructions for how to parse the JSON, it's time to actually run the parser.
- Move
parseFHIR.pyfromfhir_infernotofhir_inferno\configurations\configuration_bcda - Open
BCDAConnector.pyinfhir_inferno\configurations\configuration_bcda - If following these instructions, the configs in
BCDAConnector.pyshould not have to be updated but can be if using a custom folder.config_dir- the location of the configration .ini filesinput_dir- the location of the JSON filesoutpur_dir- the location the CSVs will be output toconfigs- the name of each resource- the name must match the resource in the .ini files
- Execute the script
py BCDAConnector.py
- Confirm CSVs have been created in the output_dir (e.g.
output_csv)
Step 2: Load CSVs into Data Warehouse
Now you need to load the CSVs into your data warehouse of choice.
Step 3: Import dbt Package
Now you're going to import the bcda_connector dbt package into your dbt project (create a new dbt project if you don't already have one). This package will convert the CSVs into the Tuva Input Layer.
-
Add the bcda_connector to your packages.yml
packages:
  - git: "https://github.com/tuva-health/bcda_connector.git"
revision: main -
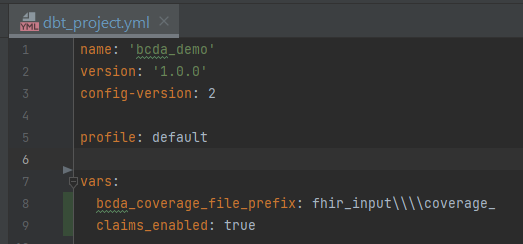
Add the following vars to your
dbt_project.ymlwith the applicable valuesbcda_coverage_file_prefix- a string of text to parse enrollment date- When CMS sends enrollment data, it does not contain an explicit field with the year and month. It is implied
that members present in the monthly coverage file are enrolled. So the date that the file is sent needs to be stored in the database as a discreet field to be used for analytics. This is done by parsing the filename which contains the date of the file. FHIR inferno contains a filename field in every table and below is an example from coverage. The string
fhir_input\\coverage_needs to be removed from to parse out the date. In my dbt_project.yml, my var will bebcda_coverage_file_prefix: fhir_input\\\\coverage_(there are 4 backslashes to escape the)
- When CMS sends enrollment data, it does not contain an explicit field with the year and month. It is implied
that members present in the monthly coverage file are enrolled. So the date that the file is sent needs to be stored in the database as a discreet field to be used for analytics. This is done by parsing the filename which contains the date of the file. FHIR inferno contains a filename field in every table and below is an example from coverage. The string
From here you're ready to import the Tuva package and run dbt build to populate the data model and load all seed files.
CMS CCLF
The Medicare CCLF Connector maps CMS's Claim and Claim Line Feed (CCLF) data model to the Tuva Input Layer. CCLF data are claims data files that are made available to organizations that participate in value-based payment programs (e.g., the Medicare Shared Savings Program).
Working with CCLF data can be challenging. The data will be duplicated in many ways. You will receive regular files and run-out files, which often overlap. The other challenge is that member and claim identifiers may shift over time.
This connector deduplicates your data following guidance from the CCLF Information Packet with additional logic created by Tuva to fill in gaps or to clarify instructions that are not always clear in the documentation.
Step 1: Identify the most recent MBI
The first step is to identify the most recent Medicare Beneficiary Identifier (MBI) since this can change over time. The beneficiary XREF file (CCLF9) is used as a crosswalk between MBIs that are present on older claims and new MBIs that may have been issued after the claim was processed (CCLF Information Packet, Section 5.1.1, Creation of the Most Recent MBI field (MR_MBI) for use in the Natural Key). These files often contain conflicting information within the same file and across files. For this reason, we use a window function to partition and sort previous MBIs (prvs_num) to get the current MBI (crnt_num) and then ensure that we grab the most recent current MBI.
Step 2: Group related claims
A single episode of care may include multiple claims: the original claim and any corresponding cancellation and adjustment claims. The next step is identifying natural keys for each claim type and then using those keys to group related claims (CCLF Information Packet, Section 5.1.2, Natural Keys).
Part A Institutional files:
- CLM_BLG_PRVDR_OSCAR_NUM
- CLM_FROM_DT
- CLM_THRU_DT
- Most recent MBI
Part B Physician/DME files:
- CLM_CNTL_NUM
- CLM_LINE_NUM (not listed in CCLF docs, we include this to prevent line detail loss)
- Most recent MBI
Part D File:
- CLM_LINE_FROM_DT
- PRVDR_SRVC_ID_QLFYR_CD
- CLM_SRVC_PRVDR_GNRC_ID_NUM
- CLM_DSPNSNG_STUS_CD
- CLM_LINE_RX_SRVC_RFRNC_NUM
- CLM_LINE_RX_FILL_NUM
Step 3: Sort related claims
Once the related claims are grouped, we use logic to sort them to get the latest ("final") version of that claim.
Part A & Part B grouped claims are sorted by the latest CLM_EFCTV_DT and CUR_CLM_UNIQ_ID since CLM_ADJSMT_TYPE_CD has been found to not be used consistently to indicate the final version of an adjusted claim for these claim types. CMS often issues these adjusted claims with a CLM_ADJSMT_TYPE_CD of "0" (Original Claim).
Part D grouped claims are sorted by the CLM_ADJSMT_TYPE_CD code ("0" Original Claim, "1" Cancellation Claim, "2" Adjustment claim).
Step 4: Reverse dollar amounts for canceled claims
Payment amounts on each record are not "signed" to indicate whether the payment amount is a payment to the provider or a recovery from the provider. Therefore, it is necessary to use the CLM_ADJSMT_TYPE_CD to determine whether to "add" or "subtract" the payment amount from the running total.
Identify canceled claims using the CLM_ADJSMT_TYPE_CD ("1" Cancellation Claim) then multiply the claim payment amount by -1 to reverse the amount.
(CCLF Information Packet, Section 5.3.1, Calculating Total Part A and B Expenditures)
Step 5: Sum dollar amounts and filter to final version of the claim
For Part A claims, we sum the adjusted header amounts and add the claim line details, then logic is applied to determine if the claim line paid amounts should be attached to the claim. Per the CCLF docs, "The revenue center payment amounts should only be relied on if they sum to the header level payment amount. If the revenue center level payment amounts do not sum to the header level payment amount, then the revenue center level payment amounts should be ignored." (CCLF Information Packet, Section 3.5, Part A Header Expenditures vs Part A Revenue Center Expenditures)
For Part B claims, we sum the adjusted line amounts.
For all claims, including Part D claims, final adjustment logic is applied by selecting the latest version of the claim. We also remove any remaining claims with a canceled status since the Tuva Project data marts are primarily focused on population health analytics.
(CCLF Information Packet, Section 5.3.1, Calculating Total Part A and B Expenditures)
Instructions
Step 1: Clone or Fork this Repository Unlike the Tuva Project, the CMS CCLF Connector is a dbt project, not a dbt package. Use the link above to clone or fork this repository to your local machine.
Step 2: Import the Tuva Project Next you need to import the Tuva Project dbt package into the CMS CCLF Connector dbt project. For example, using dbt CLI you would cd into the directly where you cloned this project to and run dbt deps to import the latest version of the Tuva Project.
Step 3: Data Preparation
Source data:
The source table names the connector is expecting can be found in the _sources.yml config file. You can rename your source tables if needed or add an
alias to the config.
File Dates:
The field file_date is used throughout this connector to deduplicate data received across regular and run-out CCLFs. We recommend parsing this date from
the filename (e.g., P.A****.ACO.ZC1Y**.Dyymmdd.Thhmmsst) and formatting it as "YYYY-MM-DD".
Enrollment Dates:
The CCLF specification does not have a field that can be mapped directly to enrollment_start_date and enrollment_end_date, and the Part A and Part B
entitlement dates (BENE_PART_A_ENRLMT_BGN_DT, BENE_PART_B_ENRLMT_BGN_DT) are often incorrect or not useful for claims analytics.
We have included an additional source called Enrollment that can be populated with enrollment dates relevant to your data. These enrollment
dates may come from an attribution file, beneficiary alignment report (BAR), or any source you may have. You just need to create a source table with the
following columns:
current_bene_mbi_idenrollment_start_dateenrollment_end_datebene_member_month- The connector includes logic to handle enrollment spans or member months.
- If enrollment spans are available, leave this field null.
- If enrollment spans are not available, populate this field with member month dates in the format "YYYY-MM-DD" and set the variable
member_months_enrollmentto true in thedbt_project.ymlfile.
Step 4: Configure Input Database and Schema Next you need to tell dbt where your CMS CCLF source data is located. Do this using the variables input_database and input_schema in the dbt_project.yml file. You also need to configure your profile in the dbt_project.yml. Check dbt docs if you're new to dbt and unsure how to do this.
Step 5: Run Now you're ready to run the connector and the Tuva Project. For example, using dbt CLI you would cd to the project root folder in the command line and execute dbt build. Next you're now ready to do claims data analytics!
Sample Data
Use the links below to download CSVs of the synthetic sample data used to create this connector from our public resources bucket on AWS S3:
- Part A Claims Header File (CCLF1)
- Part A Claims Revenue Center Detail File (CCLF2)
- Part A Procedure Code File (CCLF3)
- Part A Diagnosis Code File (CCLF4)
- Part B Physicians File (CCLF5)
- Part B DME File (CCLF6)
- Part D File (CCLF7)
- Beneficiary Demographics File (CCLF8)
- Beneficiary XREF File (CCLF9)
- Enrollment File (custom)
CMS LDS
CMS provides robust documentation on LDS data here.
The CMS LDS data is a limited dataset made available by CMS to researchers and organizations doing research. Strictly speaking, it is not a de-identified dataset, but a limited dataset. A limited dataset is a dataset that has been redacted, meaning patient identifiers have been removed, but the dataset has not gone through a full de-identification process, of which there are two (i.e. Safe Harbor and Expert Determination), as outlined in HIPAA.
The LDS dataset maybe purchased by organizations (e.g. companies) and used for commercial purposes, so long as the organization complies with all aspects of the data use agreement and the primary purpose for acquiring and using the dataset is to further generalizable knowledge (e.g. via research publication).
Elation
Elation is an electronic medical record system widely used in the ambulatory setting. One of the great things about Elation is that they make the backend database available to their customers via Snowflake data share. This makes it very easy to access data from Elation for analytics purposes.
Epic (Clarity)
Epic is the most common electronic health record system in the United States. Epic comes with two databases: Clarity and Caboodle. This connector maps Clarity to the Tuva Input Layer.
Health Gorilla
Health Gorilla offers a FHIR API that connects to CommonWell, Carequality, and other nationwide health information exchange partners. Health Gorilla delivers data in FHIR format i.e. JSON.
The first step is using FHIR Inferno to flatten the JSON into relational CSV tables and load those CSVs into data tables inside your data warehouse. The Health Gorilla Configs used by FHIR Inferno transforms the JSON specific data tables expected by the Health Gorilla Connector.
Healthie
This is an early release of the Healthie connector, based on Healthie's API documentation and Bridge offering.
Metriport
Metriport offers clinical data from the largest health information networks in the country, via a single open-source API.
Metriport provides clinical data in the FHIR R4 JSON format.
Step 0: Get FHIR data from Metriport
First things first, pull FHIR data from Metriport using whatever method you're comfortable.
- See Metriport's postman collection.
- See Metriport's API docs.
Save the file to only contain the Bundle.entry array.
Step 1: Convert FHIR JSON to NDJSON
First, we need to convert our FHIR json data to NDJSON. We recommend using the command line tool jq to do this - brew install it! Once it's installed, run the following command on the file, e.g. "metriport-fhir.json", in your terminal.
jq -c '.[]' metriport-fhir.json > output.ndjson
Step 2: Use FHIR Inferno to Flatten JSON and Prepare Data Tables
Clone the FHIR Inferno.
Use the helper-scripts/create_table_create_csv.py script to generate SQL scripts based on the Metriport Configs. We recommend naming your schema RAW_DATA, for consistency. Execute the resulting SQL scripts in your data warehouse to create resource-specific tables in this schema.
Next, use helper-scripts/parse_ndjson_bundle.py to transform the NDJSON into relational CSV tables and load those CSVs into the data tables created in the previous step, in correspondence to their resource type.
Step 3: Set up 'Metriport Connector'
Now clone the Metriport Connector (i.e. dbt project) to your local machine.
All of the configurations you will need to make will be in the dbt_project.yml file:
- set the
input_databasevar to the name of the database where our flattened Metriport data is - set the
input_schemavar to the name of the schema where our flattened Metriport data is (i.e.RAW_DATA) - if you've followed other dbt setup guides and your profile name is anything other than
default, you need to change theprofile:configuration to match what you've set in your profiles.yml.- Confused? Check the DBT docs: connection profiles.
You can also use this opportunity to set any normal dbt configurations you want, such as the output database or schema and any custom documentation pages, etc.
Step 4: Run
Now you're ready to execute dbt build and run the entire project.
Zus
Zus offers tabularized FHIR data in the form of data marts via Snowflake data share, and makes their schema publicly available.
This is an early release of the connector -- as with any connector we welcome and look forward to community contributions to improve the connector.